Animation Tutorial: Electric Sparks
The following article is intended to explain the steps required to draw an electrical spark. A given user is expected to first gain a basic understanding of what a spark is. Upon acknowledging the basic definition, the user will be provided a breakdown of the animation process, then given a practical application of the process using GIMP.
Alternatively, the user may choose to apply the given .gif to an existing image, in which case they are advised to skip to the appropriate section.
Overview
According to the Oxford Languages dictionary, in general, a spark is "a small fiery particle thrown off from a fire, alight in ashes, or produced by striking together two hard surfaces such as stone or metal."
In regards to mechanical devices, electronics are not meant to spark. Most conductive material is insulated so that accidental discharges and outside interference do not affect the intended operation of the given device. Therefore, a spark occurs when the quantity of electricty exceeds the insulating capabilities of the intervening material, resulting in a brief emission of light and sound (the latter is is not imporant for this tutorial).
Once a spark is produced, two potential fates await it. For the purposes of this tutorial, a spark is short-lived. However, if power is continually supplied, a spark can evolve into an electrical spark, which is a concept outside the scope of this tutorial.
==Components of an Electrical Spark These are not necessarily the real terms. However, for the purposes of the article, they will serve to divide an electrical spark into different components based on their intended movement. There is also a fourth component that exists only in relation to the context in which a spark is used.
Base
The base refers to the small cone of light from which a spark originates. At the base, the spark is at its hottest and brightest. However, the base will very quickly fade away, at which point it will rapidly shrink as its power source is cut away.
Trail
As mentioned under the overview, a spark is a small, firey particle. Naturally, fire is hot, but a fire is only hot while it has something to burn. The base can only grow to a given size before it begins to dissipate. While the base itself will continue to burn for a little while, the surrounding trails of light will lose energy, moving increasingly slowly. Once a certain point is reached, the spark will have lost enough thermal energy to no longer be visible and fade to just a few pinpricks of light, then nothing at all.
In addition, note that there are two types of trails:
- Primary: a long trail that lasts for the entire duration of the animation
- Auxiliary: a short trail that only lasts a few frames before fading
Glow
Sparks are a light source. As such, a spark should be as close to pure white as possible. That said, a spark should not have hard edges. For an added touch of realism, adding a neutrally-colored, blurred outline around the initial frame contents will improve the aesthetics of an electrical spark.
Interpreting as an Animation
This section will discuss electrical sparks as an animation. Although the images are drawn in GIMP, any terms related to photo manipulation tools will not be used in this section. A different section will discuss electrical sparks as a photo manipulation.
Boundaries and Direction

The first thing to do is to determine how big the resulting electrical spark should be, specifically as a result of two factors.
- Length: how long the spark can travel before fizzling out
- Width: how many trails are emitted by the base
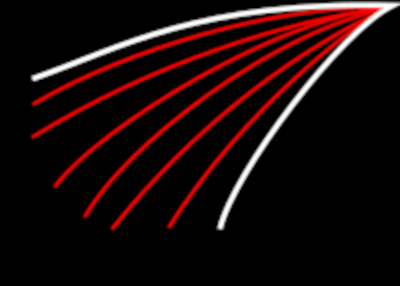
The components of the spark are thereby restricted to the space within the resulting boundary, represented by the white lines.
Next, the spark requires a direction. As the sparks travel, the resulting trail should follow a given path; deviating from the path causes jitter. For the sake of visual consistency, each trail should travel a given path with as little deviation as possible; the red lines represent potential paths the primary and auxiliary trails can take. While it's a good idea to plan out specific paths for the trails beforehand, it's more than acceptable to plot out a number of equally spaced lines and work from there.
That said, there should be a limit on the number of trails present. Remember: a spark is a streak of light. If too many trails are drawn, the result will be less a beam of light and more a block of solid color. For this reason, if paths are planned beforehand, only a small number (around 3) of paths should act as primary trails, with each primary trail accompanied by a similarly small number of auxiliary trails
As always, the boundary and direction depend on context. Specifically, a spark is fast. For example, at 15 frames per second, a spark only needs between 5 and 10 frames; anything less is too fast to see, and anything more turns the spark, a beam of light, into a physical object. Therefore, size is also dependent on the number of frames involved. If a spark is too big and too many frames are needed, try shrinking the boundaries and try again. Conversely, if the spark is so small to draw enough frames, a bigger boundary is needed.
Rate of Travel

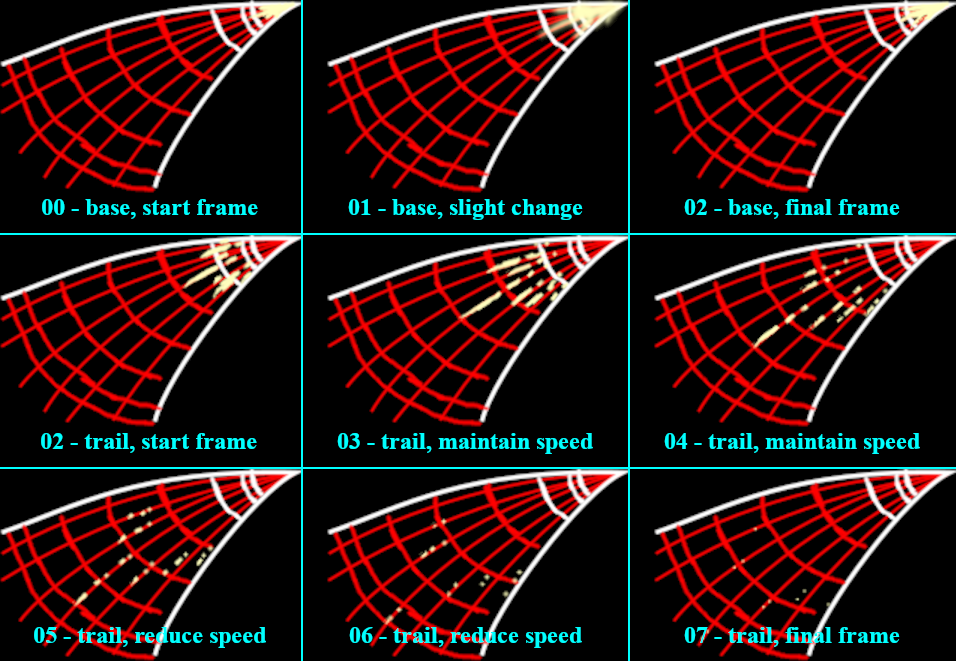
In general, the life cycle of an electrical spark can be divided into three phases:
- Initialization: When a spark first appears, it's a single cone of light at the starting location. This cone of light will very quickly grow until it hits the next stage. This stage only contains around 2 frames.
- Midpoint: Almost immediately after appearing, the base begins fizzling out. As it fizzles out, some of the light, no longer connected to the base, continues trailing outwards, following a given path. This phase is primarily a transition between phases 1 and 2, and only encompasses a single frame.
- Fade Away: A spark is hot. As it travels, it gets increasingly cool until it's about the same temperature as the air around it, at which point it ceases to exist. In addition, as it cools, the trails of light move with increasing difficulty through the air, deaccelerating and shrinking until there's not enough heat left to keep moving.
Regarding point 3, not all trails fizzle out at the same time. The primary trails, owing to their increased length, will last until the final frame of animation. Conversely, any auxiliary trail, by definition, both begins smaller and fades out quicker, often several frames before the associated primary trail.
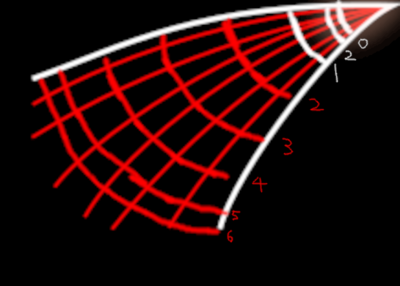
In the image to the left, items related to the base are white, and items related to the trails are drawn in red.
The numbers next to the boundaries represent what frames the boundaries relate to, with frame 2 appearing twice.
In general, as the base grows, the white lines should be equidistant. As the base fades away, either use one of the previously given boundaries, or draw a new boundary somewhat closer to the starting point. As stated before, the number of frames needed for the base should be minimized as much as possible.
In contrast, the distance between successive red boundaries should increasingly shrink. In general, deacceleration seems mostly occur near the end of the animation; the first few frames start out fairly equidistantly spaced, but the last few frames are closer together. By the end, the final pinpricks of light will teeter just next to the overall boundary.
Drawing the Frames
Organizing Frames in a GIMP
This section is not intended to teach a user how to draw and assumes that a user has a basic understanding of the GNU Image Manipulation Program. More experienced users should try setting up the guidelines and draw the frames themselves, and inexperienced users can use the above frame breakdown as a reference. Otherwise, this section is mostly a recommendation for organizing individual frames as layer groups.
Organizing the Layer Groups
Each frame is a layer group, with elements in each frame given as its own layer, where n represents the current frame (starting from 00):
- base_n, represents the main component of the base, color should approach pure white
- glow_base_n, a blurred copy of base_n, color should approach neutral (between #FFFFFF and #000000)
- trail_n, represents the slowly fading trail, color should approach pure white
- glow_trail_n, a blurred copy of trail_n, color should approach neutral (between #FFFFFF and #000000)
In addition to the frames, another layer group, named outline, is used to store the boundaries and direction lines, and components are named as follow:
- boundary: the thick white lines that encompass the space the spark is allowed to occupy
- direction: the potential paths the trails are allowed to follow
- stop_base: divides the base in regards to the frames they occupy
- stop_trail: divides the trails in regards to the frames they occupy
Adding Glow Effects
- select either a base_n or trail_n layer
- copy, paste, and anchor the layer
- prepend "glow_" to the name of the new layer
- find the color balance tool under Colors -> color balance
- under "select range to adjust", select "Highlights"
- adjust colors until satisfactory (if the original layer was drawn in yellow, set RGB to (100, -100, -100), which represents more red, more magenta, and more yellow)
- select gaussian blur under filters -> blur -> gaussian blur
- apply an appropriate level of blur
- blurs start out minimal
- base layer glows require less blur in comparison to trail blurs
- trail glows become increasingly blurred as the animation progresses
Using the Animation
If you followed the above steps, you should get the following as an output:
If you didn't get the following output, that's okay. If you skipped directly to this step, that is also understandable. For the next part of the tutorial, you can use the .gif provided in the following steps.
Adding Effect to an Existing .gif, Frame by Frame
Notes before starting:
- "spark" refers to the animation of the electrical spark
- "target" refers to the image on which the sparks are applied
- "layer" and "frame" are used interchangeably
Steps for Applying the Spark Effect:
- Download the image
- In GIMP, open the spark as layers
- In the opened project, move every layer within the spark into a layer group (a given set of operations, such as movement and transformations, affect all layers within a layer group)
- Download the target animation and open as layers within the same project (IMPORTANT: make sure that the .gif is not loaded into the spark layer group)
- Within the target animation, determine some frame n from which the spark effect will start
- Move the layer group containing the spark effect to a good starting position
- For target frames n to n + m, where n represents the starting frame and m represents the number of frames within the spark, perform the following steps:
- For frame n, identify the corresponding frame within the spark, which will be a number from 0 to m (for example, if starting at target_frame=5, it'll correspond with spark_frame=0, then target frame=6 -> spark frame=1, and so on such that target_frame=5+m corresponds with spark_frame=m
- Copy, paste in place (ctrl+alt+v), and anchor the corresponding spark frame from the layer group
- Reorder the spark frame above the corresponding target frame
- Merge the spark frame down to the target frame
- Repeat for each frame in the spark animation
- Delete layer group
- run the animation playback to test how the overall .gif will look, adjust frames-per-second as needed
- export image as .gif, make sure that frames as set as "replace"
Lighting
Of everything discussed so far, lighting is the only subject reliant solely on context and the user's intuition. As a whole, because sparks are a light source, they will brighten up objects within their immediate vicinity. However, the exact intensity and size of the light determines on the spark in question:
- Bigger sparks illuminate more things
- Brighter sparks illuminate more things further
- Directly adjacent objects are lit brighter and for longer durations
- The base produces more lights than the trails
- Lighting effects start and end quickly
To draw the lighting effect, perform the following actions:
- Based on the given object, select an appropriate color (brighter than the initial color)
- Using the brush tool, draw over the area intended to be lit
- Brush opacity should not be 100% (closer to 25%)
- If the light is just starting, only need to brush over a small area
- If light is growing brighter, brush over first a larger area, then a smaller area within the larger area
- If light is fading, only need to brush over a small area
- Erase the brush output from areas that aren't the chosen object
- Apply a gaussian blur to the results
Again, lighting is based purely on the user's own preferences. If desired, lighting can be ignored entirely. As always, a poorly drawn effect is harder to ignore than an effect that isn't there at all.
Use Cases
Imagine, if you would, going to the bathroom. It's dark, so you turn on the light. Now, for the purposes of this thought exercise, the light switch suddenly immediates a stream of sparks.
How you react to that scenario is indicative of when you should use sparks.
Too many effects will look ridiculous. Effects used in inappropriate situations will look silly. As always, temperance is the key; never do more work than you have to.
Conclusion
If you made it this far, you either learned how to animate a spark or how to take an existing effect and put it on some animation.
Go make something better than this image of Cardi B's humping the sofa and pretending to orgasm, I guess.


